I miss Brookline, Massachusetts. (That is where I'm from, for those who may not know.) I miss Super 88, the amazing Asian supermarket and food court unrivaled in all the world, and Baja Betty's for Mexican food, and PC Cafe for bubble tea. But, right at the moment, what I miss the most is Cheryl Ann's Challah Bread. Which is funny, because I don't really get it at that often in Brookline. But when we do, its always delicious, especially toasted and covered with a huge slathering of butter. Challah...that amazing rich egg bread with the slightly sweet note...Mmm.... I was lost in wanting it. Then, I had a revelation. I write a blog! I can make bread and blog about it. Its actually all for a good cause, its not just me avoiding studying for my Chemistry midterm because I have a random craving for Jewish breads. So, I made Challah Bread.
Making bread might sound like an arduous, awful task. It is really not that bad. There is the simple problem that most people don't own yeast, but once you buy a packet, you can keep it for two years without anything happening to it. You also need to have some forethought. You have to have the time to just sit around for two or more hours and wait for dough to rise, especially for this Challah which needs three risings to make it extra great. Other than that, all you generally need is flour and butter or oil. Challah is an egg-bread so it also uses, you guessed it: eggs. Beaten egg for the two egg washes are what give it that golden brown gleam and amazing crust. In general though, making fresh bread, and having that fresh bread smell in your kitchen, is so worth it that I would use any number of ingredients to achieve it. Here, I need just six.
 |
| Original Dough before Any Rising |
For my Challah recipe, I used
Smitten Kitchen's "Best Challah (egg bread) recipe." She made two loaves, and I cut it down to size for one. Other than that, I didn't change a thing. Well, I didn't add raisins or get poppy seeds for sprinkling (I....wasn't going to buy those), but I'm sure you won't mind the omissions. Check out her web site too, she has great pictures of her bread! She made circular loaves and straight ones, but I just made one circle because...I messed up in the braiding process and had to hide it. My advice to you: just follow the directions, even when they seem weird. When they say to double back a strand that you Just moved, just squish it down and then move it in the opposite direction. Fiddling with directions often gets you into trouble. Sigh.
 |
| Notice how beautiful braid turns grotesque on top. Someday, I will fix that. |
I know the instructions seem really long. But, its only the braiding thats a little tiresome. (You can also avoid it completely by just forming your challah into little buns instead of having one big loaf to braid.) The other instructions are just spaced out and extra detailed because I know a lot of people probably haven't made bread before, and its always good to know Exactly what someone means when they say "knead" or "punch down" the dough. Its really quite easy once you know how. And its so worth it. To have fresh bread on which to slather butter may be one of the greatest things in the world. This bread is moist and flavorful. And best of all, it has that Challah Crust. Those two egg washes really do the trick. So, someday when you have time, make this bread. You won't regret it.
 |
| Braiding Prep. |
Best Challah Bread
Adapted from Smitten Kitchen, Adapted from Joan Nathan
Makes 1 (large) Loaf
1 package Active Dry Yeast (2 1/4 tsp)
1/2 tbsp and 1/4 cup Sugar
1/4 cup Vegetable Oil
3 Large Eggs
1/2 tbsp Salt
4 cups All-Purpose Flour
Preparing Yeast: In a Large bowl (you will be using this to make the dough in), dissolve yeast and 1/2 tbsp Sugar in 7 oz lukewarm water. Leave alone for five minutes, until the yeast is bubbly.
Starting Dough: Whisk the oil into the yeast. Then, beat in the 2 eggs, one at a time. Next, beat in the 1/4 cup of sugar and the salt. After thoroughly mixing, gradually add the flour. Add enough flour so the dough comes together (I used about 3 3/4 cup total). Now, it is time to knead.
Note: I mixed the dough with a wooden spoon, even though it was hard work, because I don't have a KitchenAid. You can also use a mixer with a dough hook to mix the dough together and then to knead.
Kneading Dough: Turn the dough onto a floured surface. To knead, fold the dough, push it down, then turn it, and repeat. Do this until you have a round of dough that seems "cohesive, pliable, and elastic" (as
Smitten Kitchen says in her bread making page) and is smooth.
First Rising: Clean out and grease the large bowl you were using. Return the dough to it, and cover it with plastic wrap. Let the dough rise in a warm place for 1 hour, until it is almost doubled in size.
Note: You can also let the dough rise in an oven that you heated to 150 degrees and then turned off, especially in this weather when there are few warm places.
Prep for Second Rising: Take the dough out of the bowl onto a floured surface. "Punch it down" i.e. sprinkle the top with a little flour and press down on it Gently with flattened palms to deflate the dough. Try to push it into a rectangular or square shape if you can, but don't push too hard, it just takes a little.
Second Rising: Put the dough back in your greased bowl, cover with plastic wrap, and let it rise again in a warm place for half an hour.
Prep for Third Rising: If you want to add 1/2 cup of raisins you can add them here, kneading them into the dough. Otherwise, turn the dough onto the floured surface. In order to make the braided challah, take the dough and divide into 6 balls. You could stop here and have 6 smaller Challah Buns. Or you can braid them:
Braiding the Challah: Roll each ball into a strand of dough about 12 in long and 1.5 in wide. Place each strand in row, parallel to one another. Pinch the tops of the strands together. Then:
1) Move the Outside Right strand over 2 strands
2) Take the 2nd strand from the Left and move it to the Far Right
3) Take the Outside Left Strand and move it over 2 strands
4) Move the 2nd strand from the Right over to the Far Left
5) Start over with the Outside Right strand
6) Once Done Braiding You have Two Options:
A) For a Straight Loaf: Tuck the ends underneath.
B) For a Circular Loaf: Twist it into a circle, pinching the ends together.
Grease a baking sheet, and place the loaf on it. Beat the remaining egg, and brush some of it onto the loaf. (If you don't have a brush, like me, you could use a spoon or just your fingers, as I did). At this point, you can freeze the loaf if you don't want to bake it today. Or, let it rise in a warm place for another hour.
Baking: Pre-heat oven to 375 degrees. Brush the loaf with more egg. You can sprinkle the bread with poppyseeds here if you are using them. Then, bake it in the middle of the oven for 30 to 40 minutes, until it is golden. Cool the loaf on a rack.
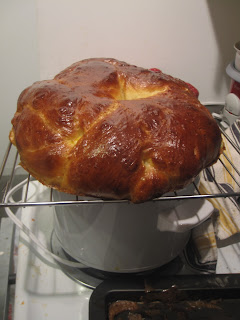 |
| Rack= Tray out of Toaster Oven placed over Empty Slow Cooker |
Notes:
If you froze the loaf, take it out of the oven 5 hours before you want to bake it.
Any of the three risings can be done in the fridge for a few hours instead of just an hour, allowing the flavor to develop more. Remember to take the dough out and let it get to room temperature before moving on to the next step.


