Places to Go

Sunday, August 7, 2011

Experiments in Brown Rice


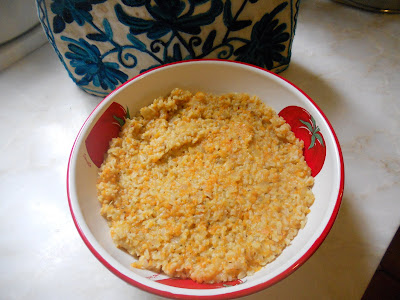
     I have too much brown rice. Some people came over for dinner yesterday, I overestimated and made two cups too many of rice. So, what do I do with a giant bowl of brown rice???? Well so maybe I have a few ideas: grilled rice balls, rice pudding, rice soup...risotto? Can I make risotto with brown rice? Let's take a minute to Google. Yes, yes I can. And I have just found the perfect recipe: Creamy Carrot Brown Rice Risotto. Yum.


     It's just that my life on the weekends is very sedentary: sit on couch, watch Lord of the Rings Again because it is coming on the television (I love the Lord of the Rings, did you know? Yes, I'm one of Those people. Absolutely and irrevocably. Now you know.) Re-read all the books of my childhood, cook, eat, hang out with friends - Repeat. So, having just eaten breakfast and retreated to my favorite corner of the couch (which is not a corner at all but the middle where all the cushions are nice and sunken in - it's one of those comfy couches with ridiculously large and fluffy pillows, be jealous), I am just not inspired to get up and cook again. I need people to feed. Where are You when I need you? *Pause for laziness*


    I found people to feed! Also, I forgot that if you wait long enough sitting on the couch, you do inevitably get hungry and then need to eat something. Oh the effects of time. So, I got up. And completely bastardized the recipe I found online. I'm sure the recipe made by Happy Healthy Mama (whose blog is very nice...even though the name makes me feel very....young and twenty and inferiorly un-mama-like) would have been delicious. It's just, she used basil and tarragon and thyme - I could not find any in my mother's spice cabinet. She used vegetable stock; I only had water.


     So, this went from being a not very traditional risotto to a completely and utterly untraditional risotto - which is nevertheless Delicious. I followed the same basic pattern of the recipe: cooked brown rice, carrot pureed in the food processor, cooking up the onions and then adding rice, carrot puree, and liquid, but changed all the details. I used garlic and ginger paste instead of garlic cloves, and rosemary, oregano, and a bay leaf as my spices. I also added red chili flakes on top, what is life without a little spicy?


     The resulting risotto is a very very satisfying lunch (and dinner). It is creamy, with just a little bit of that bite of brown rice. The rosemary accentuates the sweetness of the carrots, and the hint of oregano and red chili flakes cut in with just the right savory and spicy notes. I do love coming up with a good recipe. But I love even more having a big bowl of hot steaming food to devour while watching my movie, and the bunny rabbit living in my yard!


PS. Not that I approve of the sedentary lifestyle...but it's a weekend and summer vacation people! I'll go back to work during the week.
    
Creamy Carrot Brown Rice Risotto
Adapted from Happy Healthy Mama

3 cups Cooked Brown Rice (i.e. 1 cup uncooked brown rice in 2 cups water cooked in either a rice cooker, the microwave, or a pot on the stove) 
3 Medium Carrots, Sliced (I used two medium, two small and sliced to 1/4'' thickness) 
1 tbsp Olive Oil 
1/2 Onion, Finely Chopped 
1 tsp Garlic Ginger Paste 
1 tsp Ground Oregano 
1 tsp Rosemary 
1 Bay Leaf
1/2 tsp Salt (or more to taste) 
1/2 tsp Black Pepper (or more to taste)  
1 1/2 cups Water 
1/2 tsp Crushed Red Chili Flakes 

Fill a large saucepan a few inches with water, and suspend a colander over it. Heat the water until it is boiling, then lower the heat to medium-low. Add the carrots to the colander, cover it loosely with a lid, and allow the carrots to steam for five minutes or until they are tender. Then, put the carrots into a food processor and blend them until they are a fine puree, I added a few spoonfuls of the hot water from the saucepan to make the puree smoother. Set the food processor aside.

In a large skillet at medium heat, heat the olive oil. Add the onions and garlic-ginger paste, and allow them to cook until the onions are translucent (5-7 minutes). Then, add the oregano, rosemary, salt, pepper, and bay leaf. Stir them, and allow them to fry up for 1-2 minutes with the onions. Next, add the rice and carrot puree, stirring the spices in to combine. Add the water, and stir. Lastly, add the red chili flakes, stirring gently to make sure everything is combined. Stir and cook until the water has evaporated and the rice is creamy to taste, if the rice is still not tender, add more water and cook longer. When it is soft and creamy, season with more salt and pepper if needed, and serve!

Saturday, August 6, 2011

From Scratch


     I love making things from scratch. I mean, obviously, I do have a food blog after all. My extreme redundancy doesn't bore you does it? I'm sorry if it does. But, I was just musing. I do love making things from scratch. I love starting a bread dough, I cannot stand the sight of cake mixes (ah, bad pretentious me), and I start feeling slightly sick if I eat too much pre-prepared food. A month in my family's house with my whole family away? Yields too much frozen, restaurant, and take-out food. And no matter how much I missed the restaurants of Brookline, I have to start cooking again.

What could it be???
     That's why I haven't blogged lately by the way, I haven't cooked! What I blogged yesterday was an ancient post (from July 12 actually, I looked) that I had just forgotten to publish. Of all the silly things... But oh well, one moves on. And when one has not cooked at all for a month, one (if one is me) cooks a Lot. Goes quite overboard in fact. Starts making paneer from scratch.


     What is paneer? Well for those of you not obsessed with Indian food already, Paneer is a kind of cottage cheese. If you've ever been to an Indian restaurant and had Saag Paneer or Palak Paneer, paneer is the white cubes - kind of tofu-like in appearance, but so much better in taste! if I do say so myself. It is not slippery like tofu, but more like a firm ricotta and is a great palette for all sorts of vegetarian curries. It's also ridiculously easy to make (ignore all the me making from scratch stuff- it was all just empty bluster, trying to impress you with my...fairly non-existent...skills).


     It's especially easy to make when, because one's family is gone and one's family get's milk delivered to one's home, one has far too many bottles of milk. What am I supposed to do with all that milk? Well, boil the bottles (ok...the Milk In the Bottles...picky picky) that are starting to go bad. This is a Very Good use of sour milk, what else are you going to do with it after all? So, boil, add lemon, add yogurt, and hey presto! Paneer. Ignore the funky smell: when you boil slightly bad milk and then start adding lemon to it, there is going to be funky smell. After all, what you are doing is separating the milk into curds (the white solids) and whey (the leftover liquid)! The curds are what will become the paneer once you drain the entire mixture through the cheese cloth overnight, get them all nice and dry, cut them up, fry them up with some spices (cumin seeds, salt, pepper, just a touch of red chili powder)....oh so good. Creamy and melty inside, crisp on the outside. Yum. I am going to go eat more now.


Fresh Paneer

3/4 Gallon Milk (I used 1%, but we've made it with 2% as well)
3 tbsp Lemon Juice
3 tbsp Yogurt
Cheesecloth

Put a very large saucepan (I used my pasta pot) on medium heat, and add all the milk. Stirring occasionally to keep the milk from burning, heat the milk until it boils. Once it is boiling (don't let it boil over!), lower the heat to low and add the lemon juice and yogurt.There is no need to stir. Keep an eye on the pot, if the curds (white solids) start separating from the milk and floating on top of the liquid, you have added enough lemon. If it's been a few minutes and there's no separation, feel free to add a tablespoon more of lemon juice. After about 15 minutes at low heat, the milk should look very watery (it will not be clear - just very thin), and there should be many white solid masses. At this point, turn off the heat. Let the mixture cool thoroughly.

Meanwhile, layer your cheesecloth on a colander, allowing enough cloth hanging off the sides so that you can wrap the curds inside once they are drained. Place your colander in a large steel bowl, so that it has something to drain into. If you own a very large colander, I'm sure you could pour all of your cooled mixture into it and allow it to drain in peace. Since my colander is small and I had a lot of milk, I did it in batches - first just pouring in a lot of liquid and letting it drain, then adding all the curds. When there was very little liquid left, I wrapped the rest of the cheesecloth over the curds and left it overnight. In the morning, I unwrapped the cloth, and scraped the paneer into a glass bowl which I put into the fridge.

This paneer is crumblier than store-bought paneer, so it won't cut nicely into cubes. To fry it up, I rolled it into firm balls and was Very careful when flipping them in the pan. But, you can also crumble it into a nice scramble, like the tofu scramble I made a while ago. And more paneer recipes using it will be coming soon!

Wednesday, August 3, 2011

Summer Time


     There is a bag of strawberries in my freezer. And every time I pull out the freezer drawer, it stares at me as if to ask: "What am I still doing in here while you are in the kitchen? Why the *bleep* (tis a foulmouthed strawberry bag) haven't you used me yet???" For the past few days I have stared back at it sadly. I have made lame excuses. "I am sorry strawberries, I just got back from work." or "I am sorry strawberries, it is too hot to move." or worst of all: "I am sorry strawberries, but I just don't feel like cooking." Since when did I turn into this person??? Today, the strawberries will not be ashamed of me.


     So, what did I do to make them happy and smiling again? (Sometimes, metaphors just keep going and its hard to know when to kill them....Forgive me Internet.) Well, I turned them into cake! Strawberry Cake. How delicious does that sound? And this was not any strawberry cake. It was not strawberries pureed into a cake or homemade strawberry jam (someday, I will tell you this story) to put into a cake, it was a cake dimpled with Huge Strawberry Halves. Yum.


     This cake was baked last night. Because I was in a foul mood, and the idea of a strawberry cake and making the strawberries happy was just too much goodness for me to deny. Also, I feel awful about my slow blogging pace. Must. Buck. Up. Anyway, last night I decided to make this cake. This morning, my mom had a meeting at home, where she was serving tea - and cake. If I go home from work to find out that my entire strawberry cake (not counting the giant piece I ate with my mom and brother shortly after it came out of the oven of course) is gone, I will be a not so happy blogger.


     But, how could I blame anyone who wanted to eat this entire cake. First of all, I didn't just put strawberries in it. I also put raspberries and blueberries (we had a frozen berry medley in the freezer). And I used brown sugar instead of all granulated sugar.


     It turned out so well. I told you I was in a foul mood, didn't I? I was letting there be lumps in my batter (only small lumps...) and I was making my little brother take all the pictures (isn't he great!!! Yay GS!), but this cake made me happy. Warm out of the oven, it tasted like summer. Like cobblers and crumbles and all those lovely desserts, like fruit and a touch of sweetness. It was just a cake, but it was a homey, not rich but comfortable, berry-ful cake. And best of all, it was so easy to make I could make another one TODAY. But of course I wouldn't...I think.


Strawberry Summer Cake
Adapted from Smitten Kitchen

6 tbsp Butter (or Smart Balance or margarine, i.e. what I used)
1 1/2 cups All-Purpose Flour
1 1/2 tsp Baking Powder
1/2 tsp Salt
1 cup Brown Sugar
2 tbsp Granulated Sugar
1 Large Eggs
1/2 cup Milk
1 tsp Vanilla Extract
1 cup Strawberries (fresh or frozen)
1 cup Mixed Frozen Berries

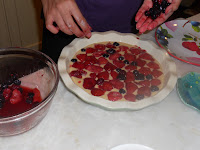
Pre-heat the oven to 350 F and butter a 9'' deep dish pie pan (or a regular 10'' pie pan if you have that). First, make sure your berries are defrosted if you are using frozen berries. Then, cut the strawberries in half lengthwise (as shown above). Next, in a small bowl, whisk the flour, baking powder, and salt together. In a large bowl, beat together the butter and brown sugar until it is pale and fluffy (it will take a while). Then, mix in the egg, milk, and vanilla until just combined. Add the bowl of dry ingredients slowly, mixing until the batter is smooth. Pour the mixture into the prepared pan. Arrange the cut strawberries in the batter, cut side down, in a one-layer pattern. Fill in the gaps with the other berries, cut them if they are too big. Sprinkle the two tablespoons of granulated sugar over the berries. Place the pan in the oven at 350 degrees and bake for ten minutes, then reduce the heat to 325 and bake the cake for another 50-60 minutes. It should be golden brown and a toothpick stuck in the center should come out clean. Once it is baked, let it cool on a wire rack for five minutes, then cut it into wedges and serve!